


Why Do Egg Tray Products Crack, Deform, or Stick Together? Troubleshooting Guide
In egg tray production, product quality problems are often not caused by one single factor. Cracking, deformation, sticking, rough surfaces, and uneven thickness can come from raw material quality, pulp consistency, forming performance, mold design, drying control, and even stacking methods after drying.
For many new egg tray factories, the first reaction is to blame the machine. But in real production, quality problems usually come from the interaction between pulp preparation, forming stability, drying conditions, and operating habits.
This troubleshooting guide explains the most common egg tray quality problems, why they happen, and how to improve them from an engineering perspective.
Diagnose the Stage Before Changing the Setting
Cracking, deformation and sticking should be diagnosed by the stage where the defect first appears. Compare the wet tray before drying, the tray at the dryer exit and the tray after cooling or stacking. Then isolate the likely area—pulp preparation, forming and transfer, drying, or cooling and stacking—change one controlled factor, and retest with a comparable sample. Changing several settings at the same time makes the result difficult to interpret.
For a full stage map, review the egg tray production process before isolating the defect.
Common Egg Tray Quality Problems
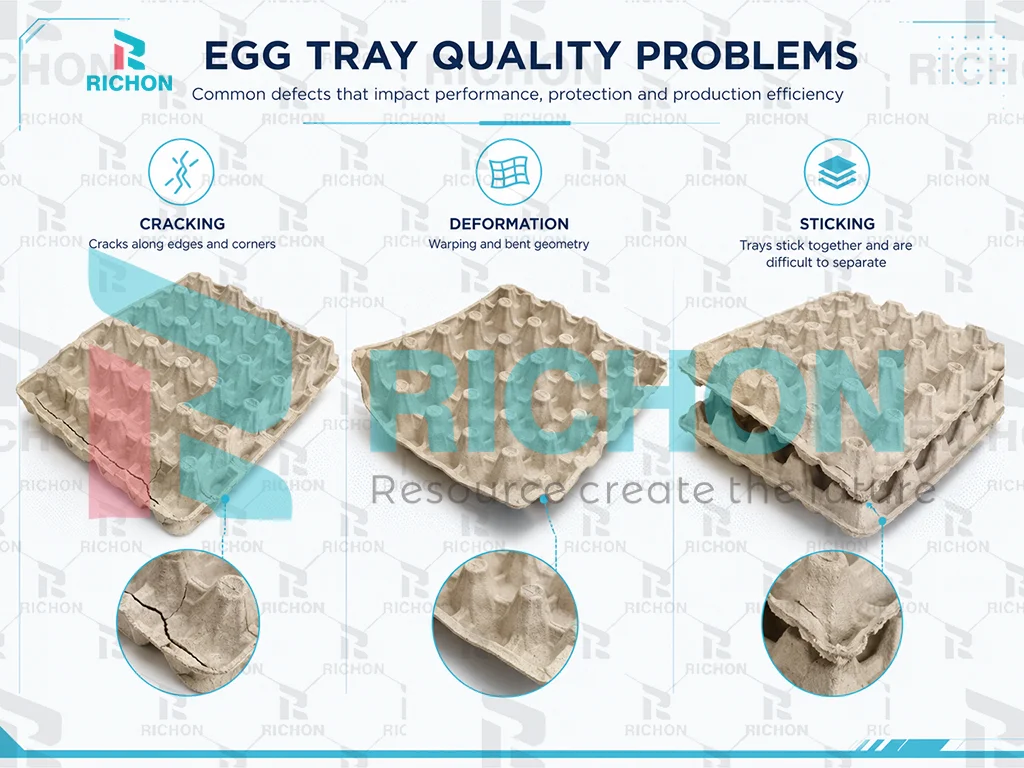
Egg tray quality problems usually appear in several visible forms:
- Cracks after drying
- Deformed or warped trays
- Wet trays sticking together
- Uneven wall thickness
- Rough surface texture
- Weak edges or broken corners
- Poor stacking performance
- Inconsistent tray weight
These problems affect not only appearance, but also packaging strength, transport stability, rejection rate, and final production cost.
A poor-quality egg tray may look acceptable at the machine output, but problems can appear after drying, stacking, storage, or transportation.
That is why quality control should not only focus on the forming machine. It must cover the full production process from raw material to finished product. For a full process overview, you can refer to the egg tray production process guide.
Quick Troubleshooting Table
| Visible Symptom | When First Observed | Likely Process Area | First Check | One Controlled Adjustment | Retest Evidence |
|---|---|---|---|---|---|
| Cracks or broken corners | Wet tray, dryer exit, cooling or handling | Forming/transfer, drying or handling | Compare defect position and wet-tray thickness before drying | Correct one confirmed transfer, support, airflow or handling issue | Same tray type; before/after photos; defect count and location |
| Warping or shape loss | Before drying, during drying or after hot stacking | Forming, drying or cooling/stacking | Compare wet-tray geometry and dryer-position pattern | Correct one confirmed thickness, airflow, cooling or stacking issue | Same tray type and dryer position; cooled-shape comparison |
| Trays stick together | Dryer exit, cooling or packed stack | Drying, surface condition or stacking | Check whether the condition is local, batch-wide or linked to hot stacking | Correct one confirmed drying, cooling or stacking issue | Cooling time record and separation observation for comparable samples |
| Weak edges or broken corners | Wet transfer or later handling | Pulp/forming, mold drainage or transfer | Inspect whether the weak area repeats at the same cavity or edge | Correct one confirmed pulp-distribution, drainage or transfer issue | Identified cavity/sample and before/after edge observation |
| Uneven wall thickness | Wet tray before drying | Pulp mixing, slurry distribution, vacuum or mold drainage | Compare repeated thin/thick areas by cavity and batch | Correct one confirmed mixing, distribution, vacuum or drainage issue | Same cavity and sample method; mapped thickness observation |
| Rough surface | At demolding or after drying | Raw material, refining or mold surface | Check impurities, fiber distribution and repeated mold-contact pattern | Correct one confirmed material, refining or surface-condition issue | Same raw-material context and cavity; surface comparison |
The matrix identifies the first controlled check; it does not prove a root cause until the result is reproduced with a comparable retest.
Establish a Comparable Baseline Before Adjustment
- Use the same tray design and identify the sample or batch.
- Record any visible raw-material change before changing machine settings.
- Inspect wet-tray shape, edge integrity, thickness pattern, release and transfer before drying.
- Record the dryer position and whether the defect appears before or after cooling and stacking.
- Select one controlled adjustment and leave other settings unchanged during the comparison.
- If no instrument reading is available, record the observation as visual evidence rather than a measured acceptance result.
When a raw-material change is suspected, compare it with the controls in the raw-material guide.
This table is useful for daily factory inspection. However, each problem still needs deeper analysis before adjustment.
Why Egg Trays Crack After Drying
Cracking is one of the most common quality problems in egg tray production. It often happens after drying, stacking, or transportation.
Common causes of cracking
The first cause is weak fiber quality. If the raw material contains too much short fiber, dust, plastic film, or impurities, the final tray structure becomes weaker. Recycled paper quality directly affects bonding strength.
The second cause is incorrect pulp ratio. If the pulp concentration is too low or the fiber distribution is unstable, the tray wall may become too thin in some areas. Thin sections are more likely to crack after drying.
The third cause is over-drying. If drying temperature is too high or the drying time is too long, the tray can lose moisture too quickly. This creates stress inside the molded pulp structure and may cause cracking.
The fourth cause is uneven thickness during forming. If some areas are too thick and others too thin, drying shrinkage becomes uneven. Cracks often appear at corners, edges, and transition areas.
How to reduce cracking
To reduce cracking, start with raw material control. Use cleaner waste paper and avoid excessive impurities. Maintain stable pulp concentration and improve pulp mixing before forming.
Then check the forming system. Vacuum distribution, mold drainage, and slurry level should be stable. If the wet tray is already uneven, drying will make the problem worse.
Finally, adjust the drying process. Avoid sudden high-temperature drying, especially when wet trays contain too much moisture. More stable airflow and controlled drying conditions can reduce cracking risk.
For more details about raw material influence, read the egg tray raw materials guide.
Cracking Diagnostic Sequence
Observe: Record whether the crack exists in the wet tray, appears at a repeated cavity or transfer point, develops at a fixed dryer position, or occurs only after cooling and handling.
Check: Inspect wet-tray thickness and edge support first, then transfer contact, local airflow or heat exposure, and post-dryer handling. A crack that already exists before drying should not be diagnosed as a dryer-only problem.
Adjust one factor: Correct one confirmed issue in wet-tray support, transfer, airflow distribution or handling. Do not increase pulp concentration and change drying settings in the same comparison.
Retest and record: Use a comparable tray type and operating context. Record crack position, affected sample count, the single adjustment and the result after cooling.
A repeated cavity or drainage pattern should be checked against the mold technology guide.
Why Egg Trays Deform or Warp
Deformation usually means the egg tray loses its designed shape after drying. It may become curved, twisted, or unevenly stacked.
Main causes of deformation
One major cause is uneven moisture removal. If one side of the tray dries faster than the other, shrinkage becomes uneven. This often happens when airflow distribution inside the drying system is not balanced.
Another cause is poor forming stability. If the wet tray is not formed with consistent thickness, it will dry unevenly. Thick areas retain more moisture, while thin areas dry faster.
Mold design can also affect deformation. Poor edge support, weak structural design, or insufficient venting can lead to uneven forming and drying behavior.
Stacking too early is another common problem. If trays are stacked before they are fully dry or before heat has dissipated, they may deform under their own weight.
How to improve deformation problems
The first step is to check moisture consistency after forming. Wet trays should have stable shape and thickness before entering the drying system.
The second step is to inspect dryer airflow. Whether the project uses natural drying, brick drying, or metal drying, airflow should not concentrate only in one area.
The third step is to improve stacking discipline. Finished trays should not be stacked too tightly while still hot or slightly wet.
For drying system selection and airflow logic, see the drying system comparison guide and the egg tray drying system cost analysis.
Deformation Diagnostic Sequence
Observe: Record whether the wet tray is already out of shape, whether warping follows a repeated dryer position, or whether shape loss appears only after hot stacking.
Check: Compare wet-tray geometry and thickness pattern, transfer support, airflow distribution, cooling condition and stacking timing.
Adjust one factor: Correct one confirmed forming, transfer, airflow, cooling or stacking issue. Do not use a higher temperature as the default response to every deformation problem.
Retest and record: Compare fully cooled samples from the same tray design and equivalent dryer position. Record where deformation remains and whether the pattern changes.
Use the drying-system comparison to review airflow and drying-path differences without assuming one dryer type is the cause.
Why Egg Trays Stick Together
Sticking often happens after drying and packing. It may look like a small issue, but it can create serious problems in transport, customer use, and stacking efficiency.
Common reasons for sticking
The first reason is incomplete drying. If trays still contain too much moisture, their surfaces may stick together under pressure.
The second reason is stacking while hot. Even if the tray surface looks dry, internal moisture and heat may still remain. When trays are stacked immediately, moisture can transfer between layers and cause sticking.
The third reason is poor airflow in the drying system. If the air cannot remove moisture evenly, some trays may remain damp even when the batch appears finished.
The fourth reason is rough surface texture. If the tray surface is too rough or contains fiber burrs, trays may lock together mechanically during stacking.
How to reduce sticking
Make sure trays are fully dried before packing. The factory should check not only surface dryness, but also overall tray stiffness and moisture behavior.
Allow trays to cool before high-stack packing. A short cooling and inspection area after the dryer can greatly reduce sticking problems.
Check dryer airflow and temperature distribution. If sticking happens only in certain batches or positions, the problem may be related to local drying imbalance.
Improve pulp refining and mold surface quality if the tray surface is too rough.
Sticking Diagnostic Sequence
Observe: Record whether sticking occurs at the dryer exit, after cooling, or only inside a packed stack, and whether it affects all samples or a repeated position.
Check: Review residual heat or moisture indicators, surface roughness, edge interlock, cooling space and stacking pressure or timing.
Adjust one factor: Correct one confirmed drying, cooling, surface-condition or stacking issue. Do not describe a visually dry surface as a measured final-moisture result.
Retest and record: Use comparable samples, record cooling and stacking conditions, and observe whether trays separate normally without damage.
Raw Material Problems That Affect Egg Tray Quality
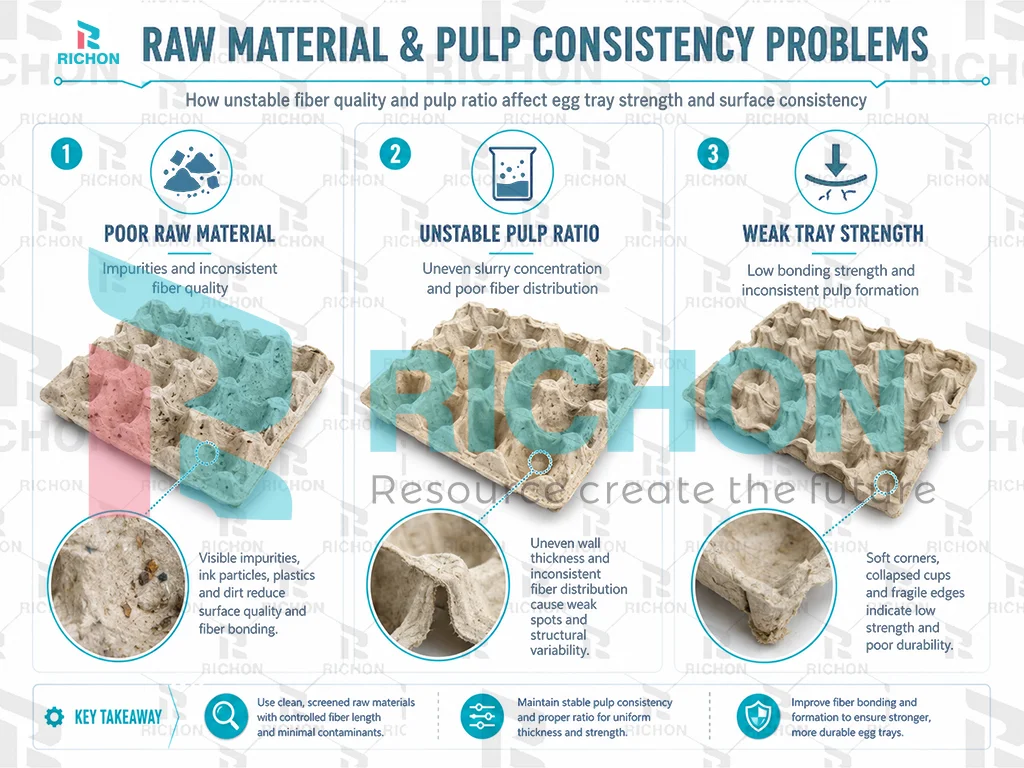
Raw material is the foundation of product quality. Many production problems begin before the forming machine.
Poor raw material may cause:
- Weak tray strength
- Rough surface
- High reject rate
- Poor pulp uniformity
- More cracks after drying
- Inconsistent tray weight
For egg tray production, common raw materials include OCC, recycled cartons, newspapers, and mixed waste paper. However, not all waste paper performs the same.
OCC usually provides stronger fiber than mixed low-grade paper. But if the material contains too much plastic film, coating, oil, sand, or dust, the pulp quality becomes unstable.
Engineering recommendation
Build a raw material classification system before pulping. Do not mix high-quality and low-quality waste paper without control. Remove obvious impurities before feeding the pulper.
Stable raw material supply is often more important than simply choosing the cheapest waste paper.
Pulp Consistency and Pulp Preparation Issues
Pulp consistency is one of the most important production parameters. If pulp is too thin, the tray may become weak. If pulp is too thick, forming may become uneven and drying may take longer.
Common pulp-related problems
If pulp concentration is too low:
- Tray wall becomes thin
- Edges become weak
- Cracking risk increases
- Product weight becomes unstable
If pulp concentration is too high:
- Forming becomes slow
- Thickness becomes uneven
- Drying energy increases
- Surface may become rough
If pulp is not mixed evenly:
- Some trays become weak
- Some trays become too heavy
- Wet tray shape becomes unstable
- Drying behavior becomes inconsistent
Engineering recommendation
Keep pulp concentration stable before forming. Operators should avoid frequent uncontrolled water addition. The pulp tank should maintain proper mixing to prevent fiber settlement.
For factories targeting stable quality, pulp consistency control should become part of the daily inspection routine.
Forming System Problems
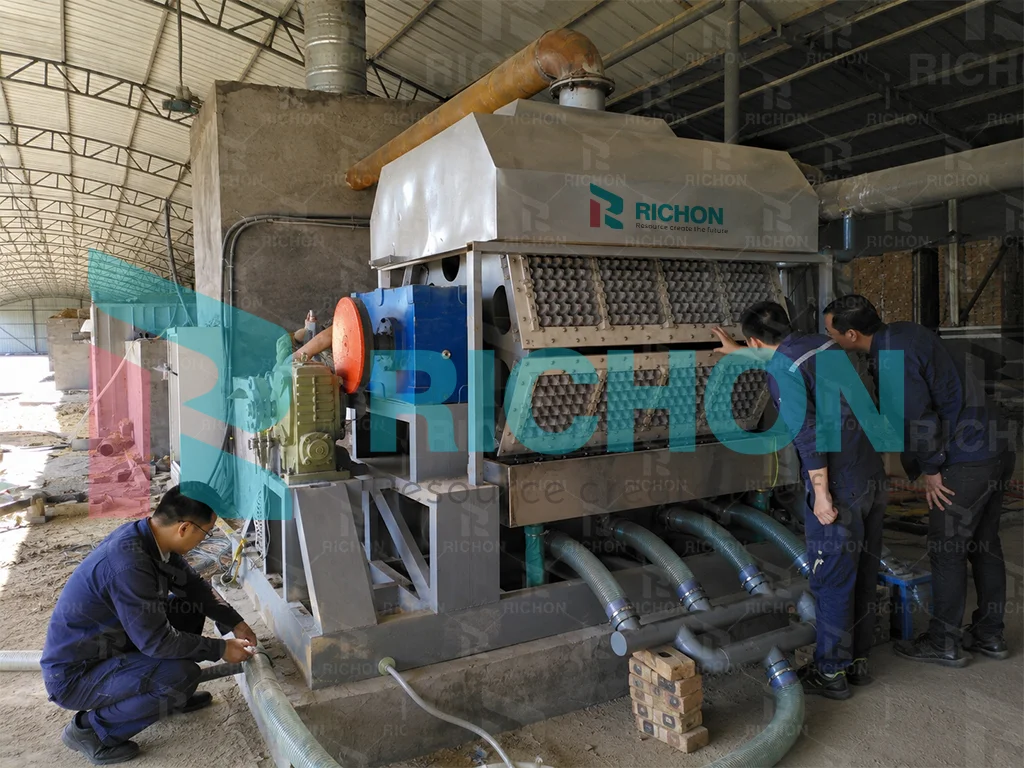
The forming system determines wet tray shape, thickness, drainage, and initial strength. Many visible quality problems after drying actually begin during forming.
Key forming factors
The first factor is vacuum efficiency. If the vacuum is weak or unstable, water removal becomes poor and the wet tray may not form properly.
The second factor is mold drainage. Blocked mold holes or uneven drainage can cause thickness variation.
The third factor is mold precision. If the mold surface is uneven, damaged, or poorly designed, the final tray shape will not be consistent.
The fourth factor is slurry distribution. If slurry flow is unstable, some areas of the mold receive more fiber while others receive less.
Signs of forming problems
- Tray weight changes frequently
- Some corners are weak
- Wet trays collapse easily
- Thickness is uneven
- Drying time becomes unstable
When these problems appear, do not only adjust drying temperature. First check whether the wet tray quality is already unstable before drying.
For equipment structure reference, see the egg tray production line solution page.
Drying Problems and Quality Defects
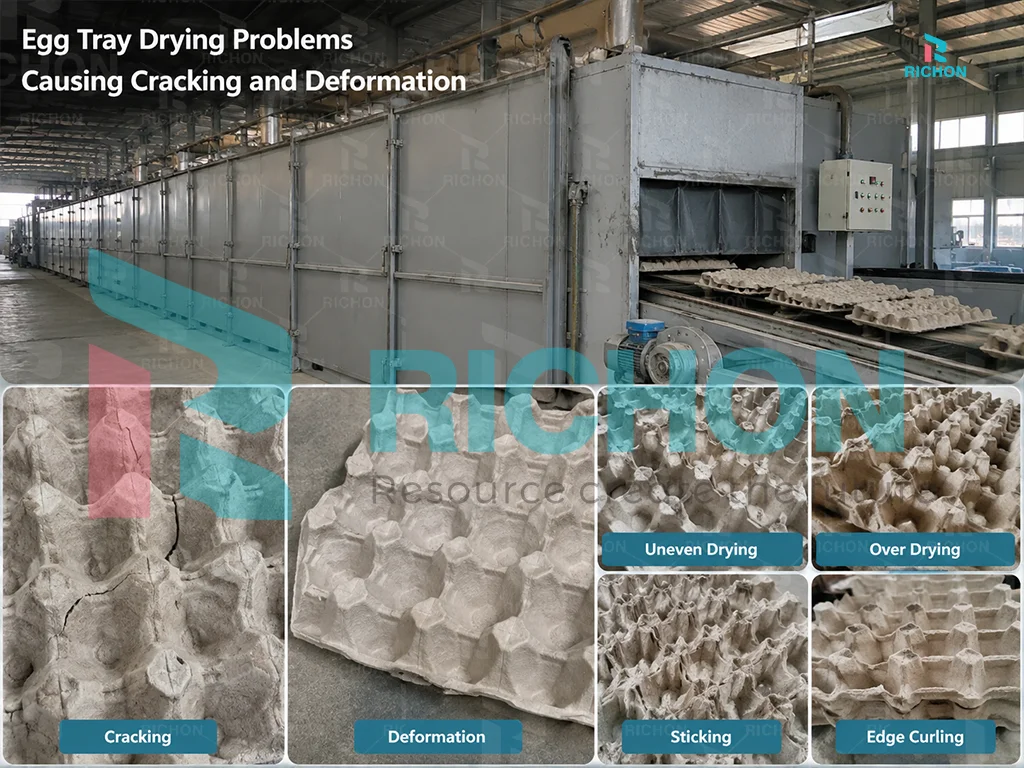
Drying is one of the most sensitive stages in egg tray production. It directly affects strength, shape, moisture, and stacking performance.
Poor drying control may cause:
- Cracking
- Deformation
- Sticking
- Uneven color
- Weak strength
- High fuel consumption
For brick drying systems, airflow design is especially important. If hot air does not move evenly through the dryer, some trays dry too fast while others remain wet.
For metal drying systems, temperature stability, conveyor speed, and airflow balance are critical.
For natural drying, weather and humidity create higher uncertainty.
Engineering recommendation
Do not increase temperature blindly when trays are wet. Higher temperature does not always mean better drying. If airflow is poor, increasing temperature may cause cracks while still leaving moisture inside thicker areas.
Drying control should balance:
- Temperature
- Airflow
- Drying time
- Tray moisture
- Loading density
Drying quality is not only an energy issue. It is a product quality issue.
Mold Design and Surface Problems
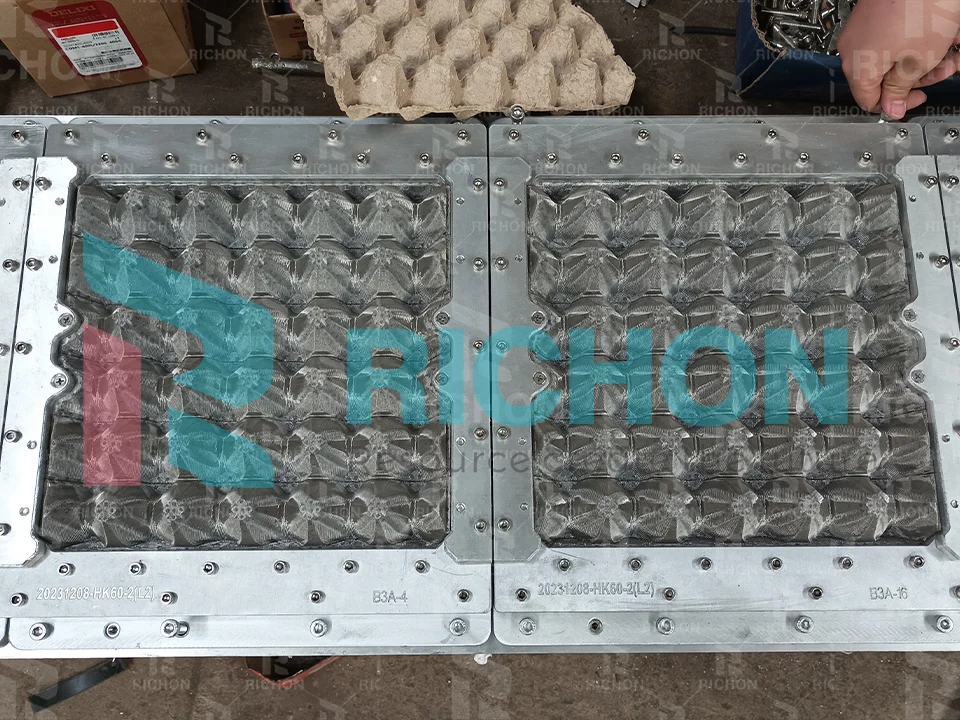
Mold quality affects tray shape, drainage, surface texture, and product consistency.
Mold-related quality issues
Poor mold design can lead to:
- Uneven thickness
- Weak corners
- Poor stacking
- Slow drainage
- Rough surface
- Tray deformation
If drainage holes are not properly designed or become blocked, the wet tray may contain too much moisture in certain areas. This increases drying time and deformation risk.
If the mold surface is damaged, trays may have rough spots or release problems.
Engineering recommendation
Inspect molds regularly. Clean blocked holes, check edge wear, and replace damaged mold sections when necessary.
For high-quality production, mold design should be matched with tray type, drainage requirement, stacking strength, and production capacity.
You can link this section to your mold page: mold technology.
Maintenance Problems That Cause Quality Instability
Some quality problems are not caused by wrong design, but by poor maintenance.
Common maintenance-related causes
- Blocked mold holes
- Worn sealing parts
- Vacuum leakage
- Pump efficiency decline
- Loose mechanical parts
- Dirty pulp pipelines
- Poor lubrication
If maintenance is ignored, production quality slowly becomes unstable. Operators may try to solve the problem by changing pulp ratio or drying temperature, but the real cause may be mechanical wear or vacuum loss.
Engineering recommendation
Create a maintenance checklist for daily, weekly, and monthly inspection.
At minimum, the factory should check:
- Mold cleanliness
- Vacuum system condition
- Pump operation
- Pipeline blockage
- Dryer airflow
- Conveyor movement
- Finished tray moisture
For cost planning, see the egg tray machine maintenance cost guide.
How to Improve Egg Tray Product Quality
Improving product quality requires systematic control, not random adjustment.
Step 1: Stabilize raw material
Use cleaner recycled paper and reduce impurities. Keep raw material types consistent when possible.
Step 2: Control pulp consistency
Avoid frequent uncontrolled water addition. Keep pulp mixing stable before forming.
Step 3: Check wet tray quality before drying
If wet trays are already uneven, drying cannot fully solve the problem.
Step 4: Optimize drying conditions
Balance temperature, airflow, and drying time. Avoid over-drying and under-drying.
Step 5: Maintain molds and vacuum system
Clean mold holes regularly and check vacuum stability.
Step 6: Improve stacking and cooling
Do not stack trays too early while they are hot or damp.
Troubleshooting Retest Record
| Record Field | What to Enter |
|---|---|
| Date / shift | Production date and shift |
| Tray / sample identity | Tray design plus a traceable batch or sample reference |
| Visible defect | Crack, deformation, sticking, weak edge, uneven thickness or rough surface |
| First observed stage | Wet forming, transfer, dryer exit, cooling, stacking or storage |
| Repeated position | Mold cavity, transfer point, dryer position or stack location when observed |
| One controlled adjustment | The only intentionally changed factor in this comparison |
| Before / after observation | Comparable visual or measured evidence, with method stated |
| Sample and abnormal counts | Actual observed counts without an invented acceptance threshold |
| Evidence reference | Photo, video, operator log or inspection record identifier |
| Result | Improved / No change / Worse / Escalate for engineering review |
When to Stop Blind Adjustment and Escalate
Escalate the issue for engineering review when:
- the same defect repeats across comparable batches;
- the wet tray is already unstable before entering the dryer;
- the defect consistently follows one mold cavity, transfer point or dryer position;
- diagnosis would require entering a hazardous area, removing a guard or intervening beside running equipment; or
- several settings have already been changed and the comparison can no longer isolate one cause.
Follow the equipment manual and the site’s safety procedure before inspection or intervention. This guide does not replace project-specific operating limits, lockout procedures or acceptance criteria.
Build repeatable inspections around the machine maintenance guide. For system-level configuration review, see the egg tray production line or contact Richon engineers.
Daily Quality Inspection Checklist
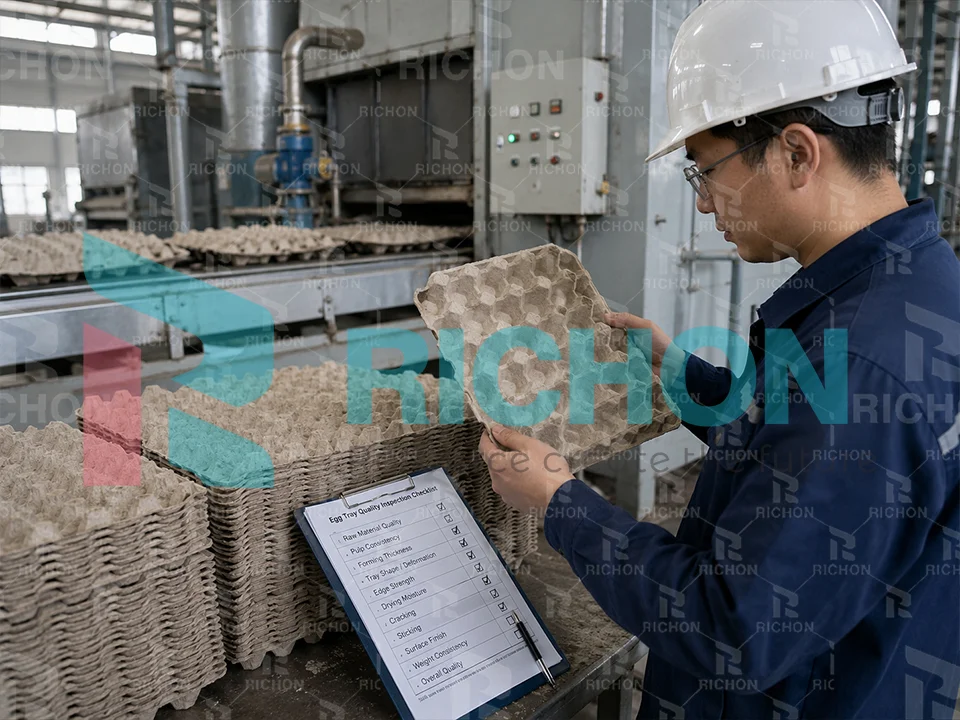
Factories can use this simple checklist during production:
- Is the pulp concentration stable?
- Are raw materials clean and classified?
- Is the wet tray thickness even?
- Are tray corners strong enough?
- Is the mold surface clean?
- Is vacuum pressure stable?
- Are trays fully dry before stacking?
- Is there deformation after cooling?
- Are finished trays sticking together?
- Is reject rate increasing?
If the reject rate increases suddenly, check raw material changes, pulp consistency, mold condition, and drying conditions first.
Final Conclusion
Egg tray cracking, deformation, sticking, and uneven quality are usually not isolated problems. They are the result of multiple production factors working together.
The most important point is:
Do not only adjust the machine. Diagnose the full system.
A stable egg tray production line depends on:
- Stable raw material
- Proper pulp preparation
- Reliable forming system
- Good mold design
- Controlled drying process
- Regular maintenance
- Correct stacking and packing habits
When these areas are controlled properly, product quality becomes more stable, reject rate decreases, and production cost becomes easier to manage.
For a complete project solution, explore our egg tray production line page or contact Richon engineers for production planning support.
FAQ Section
Why do egg trays crack after drying?
Egg trays usually crack because of weak fiber quality, uneven tray thickness, over-drying, or poor pulp consistency. The factory should check raw material, pulp concentration, forming quality, and drying temperature.
Why do egg trays deform?
Egg trays deform when moisture removal is uneven, drying airflow is not balanced, wet tray thickness is inconsistent, or trays are stacked too early while still hot or damp.
Why do egg trays stick together after drying?
Egg trays stick together when they are not fully dried, stacked while still hot, or produced with a rough surface. Cooling and moisture control before packing can reduce this problem.
How can I improve egg tray strength?
Use better recycled paper, keep pulp consistency stable, improve forming vacuum, maintain molds, and avoid over-drying. Mold design and wall thickness also affect tray strength.
Is drying temperature the main reason for egg tray quality problems?
Not always. Drying temperature is important, but raw material, pulp consistency, forming stability, mold drainage, and airflow distribution also affect final quality.
Need a Capacity Recommendation for Your Market?
Share your target output, local humidity/energy conditions, and tray type. Our engineers will suggest a suitable 3,000–8,000 pcs/h configuration and drying solution.
- Factory layout & utilities checklist
- Drying bottleneck evaluation
- Cost & ROI estimation reference
